Animalz is a remote, 20-person content agency that delivers over 250 articles per month. We could never maintain that kind of output with a distributed team without a standardized content workflow.
Our writers, researchers, and analysts work from around the world in 4 different time zones, yet our content process ensures that we always know where each article is in the pipeline at any given time. We are also able to work asynchronously, never having to be working at the same time.
While productivity tools like Slack, Airtable, and Quip help us communicate and keep track of our projects, it is our underlying process that tells everyone what they should be working on and what they need to do next. Our remote team can't ask the person sitting next to them for clarification on the process, which means our workflows must be comprehensive and easy to understand.
As we've grown, we've learned how to develop and diagram content roadmaps that enable us to consistently deliver a high volume of quality content.
Our content workflow diagrams show everyone when tasks should happen, but they are only effective when coupled with detailed documentation of how to complete each task and which roles are involved.
Diagramming workflow: When tasks happen
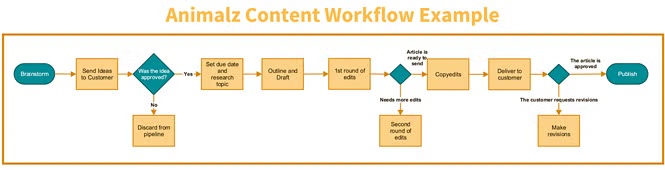
The workflow diagram puts all the roles and tasks into context, giving everyone a visual understanding of how a piece of content gets created, revised, approved and delivered.
Our goal is to keep each diagram simple, leaving no room for confusion. We approach each diagram by breaking the process into phases. Here is how we created our master workflow diagram using Gliffy:
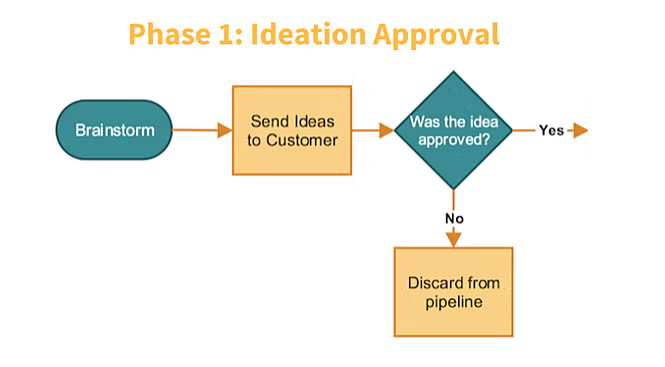
Phase One: We start our process by brainstorming ideas. Once the ideas are compiled and formatted based on our documented guidelines, the writer sends them to the customer for approval. The ideas that get approved move to the next phase.
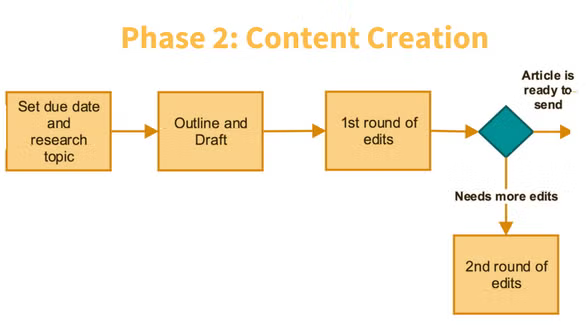
Phase Two: Approved ideas move into content creation phase where due dates are set, and research commences. The writer takes the ideas to a full draft before sending it to their editor. Based on the feedback and approval from the editor, the content either gets more revisions or moves to phase three. The editor is responsible for maintaining our high level of quality.
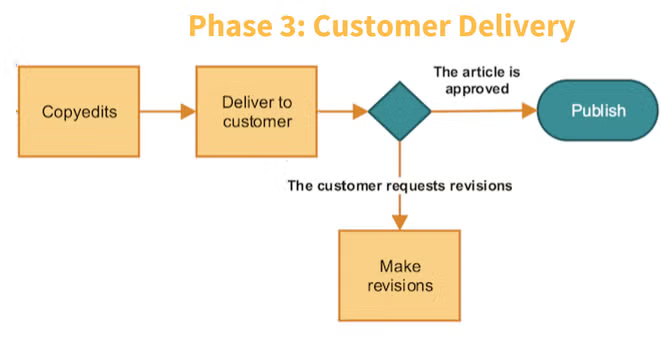
Phase Three: Our content goes through a rigorous copyediting phase to ensure there are no errors, and then the writer sends the piece to the customer for approval. Based on the customer's feedback, the writer makes revisions if needed or pushes the approved piece towards publication.
The visual representation of our content workflow allows the entire team to see the process broken up into manageable phases where each person can identify which stage they are in and understand how each task relates to one another.
Without a diagram, our distributed team would have to read paragraphs of text explaining the process and then try to visualize it themselves. Creating diagrams helps us communicate a significant amount of information within a simple, easy-to-understand visual.
Documenting tasks: What and how to do it
Every great content workflow diagram comes with supporting documentation that explains how to accomplish each task.
A task can be something like “approve an idea” or “deliver to client.” While these seem straightforward, they must be described in detail to ensure everyone completes the task in exactly the same way.
Each task description should have as much explanation as possible, so everyone knows what they need to do and how to do it without any need for clarification. A new employee should be able to read a description and know exactly how to accomplish the task.
We document all of our tasks into our company knowledge center, so employees can access any task within the pipeline and get a clear explanation on exactly what they need to do. Here is a sample of our documentation that defines what should happen before client delivery:

You can see the entire content workflow pipeline in the lefthand navigation, with a step-by-step description of how to accomplish each task on the right. We also create how-to videos using Wistia to help show employees exactly how to complete a task within the system.
In addition, we've built each flowchart phase into Airtable, our project management tool that helps us document the workflow and put it into practice. Writers move the content down the pipeline within Airtable to track progress and give everyone a centralized view of production.
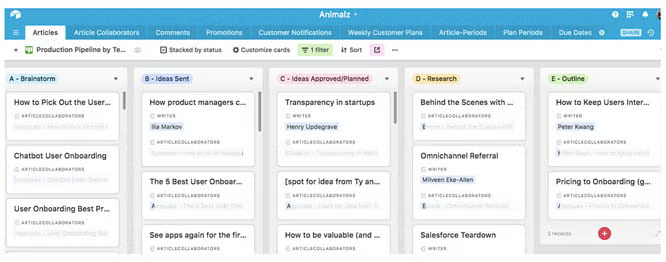
The columns in the kanban view show the phases within the workflow and each card represents a piece of content. Once writers complete a task, they simply move the card to the next phase.
When you document and track your workflow process, everyone on your team understands how to accomplish each task and how to push it down the pipeline.
Establishing roles: Who is involved
Animalz believes in winning as a team, which means each piece of content involves more than one person. Each person has a particular role that comes with distinct responsibilities throughout the various stages of the workflow.
In order to understand each role within the content workflow and define who is involved, Animalz has developed these three key roles:
- Content Manager (CM) handles the tasks that are customer facing and not related directly to writing. They are responsible for ensuring the customer is happy with the quality of the work and focus on working with the customers to implement the right content strategy to help their business grow.
- Writer / Point Person (PP) writes the content, but is also responsible for following up with customers for feedback and revisions on their pieces. Writers push their content through the workflow until it gets published.
- Researchers (R) gather information to help writers when they make a research request, and they are also responsible for copyediting, uploading content, and distributing it.
Although we keep it simple with three roles, each is involved in several aspects of the process. The best way to help the team understand the bigger picture is to create an organizational diagram using Gliffy to highlight where each role fits in.
We built our diagram around the customer to show how everything we do revolves around their happiness and success.
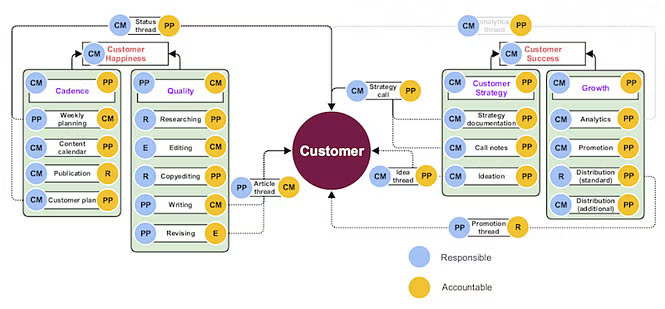
This diagram is not meant to be a content workflow. It's a big-picture view of all the major tasks and who is involved in each. When two roles get assigned to the same task, a color key indicates who is responsible for completing the task (blue) and who is accountable for the completion of the task (orange).
By visualizing where each role fits into delivering customer happiness and success, we can quickly communicate all of our essential business functions to the team, and each person can better understand how they contribute to the overall process.
A workflow diagram helps you win as a team
When everyone has a clear picture of the process and where they fit into it, content is produced faster while maintaining a high-level of quality. The same can be said for just about any other job function that requires people to work collaboratively.
At Animalz, our workflow diagrams and supporting documentation allow us to produce a lot of content without too many roadblocks or bottlenecks to stall productivity. Each member of our remote team across the world knows their role, their tasks and when to tackle each task.
By diagramming the roles and content workflows, each person is empowered to handle their specific workload knowing how they fit into the big picture. As a result, the team shares the accolades when the end product is effective, and the customers succeed.
Create your own workflow diagram now!