I bet it’s not often that you read ‘Flow Diagram’ and ‘Content Marketing’ in the same sentence.
But bear with me for a few minutes while I explain the exact process that I use to create Flow Diagrams that get shares, backlinks and comments.
The starting point is to accept that content marketing is increasingly important for online success.
The trouble is that for many businesses in what may be considered ‘boring’ niches it can be something of a struggle to come up with engaging ideas.
Another important point is that the web is increasingly visual. If you want to get shares, backlinks and comments on your content you need to include a visual element.
One way that allows me to address these issues is through the use of highly illustrated Flow Diagrams.
The beauty of them is that they tick quite a few boxes:
- They allow complex, multi-step activities to be presented visually
- They can make otherwise ‘boring’ content visually exciting
- They are easy to consume
- They are easy to share and link to
- They lend themselves to multi-step, complex processes as well as comparison and decision based content
Step 1 - Choose A Topic
I have found that the two most effective types of Flow Diagrams are to describe multi step processes or comparison/decision based tasks. Here are some examples to show what I mean:
Multi-Step Process
This could be to describe how to do Ecommerce Content Marketing or How To Do Local SEO. Basically any complex process that has a few moving parts and a logical order associated with the tasks that need to be completed.

Or
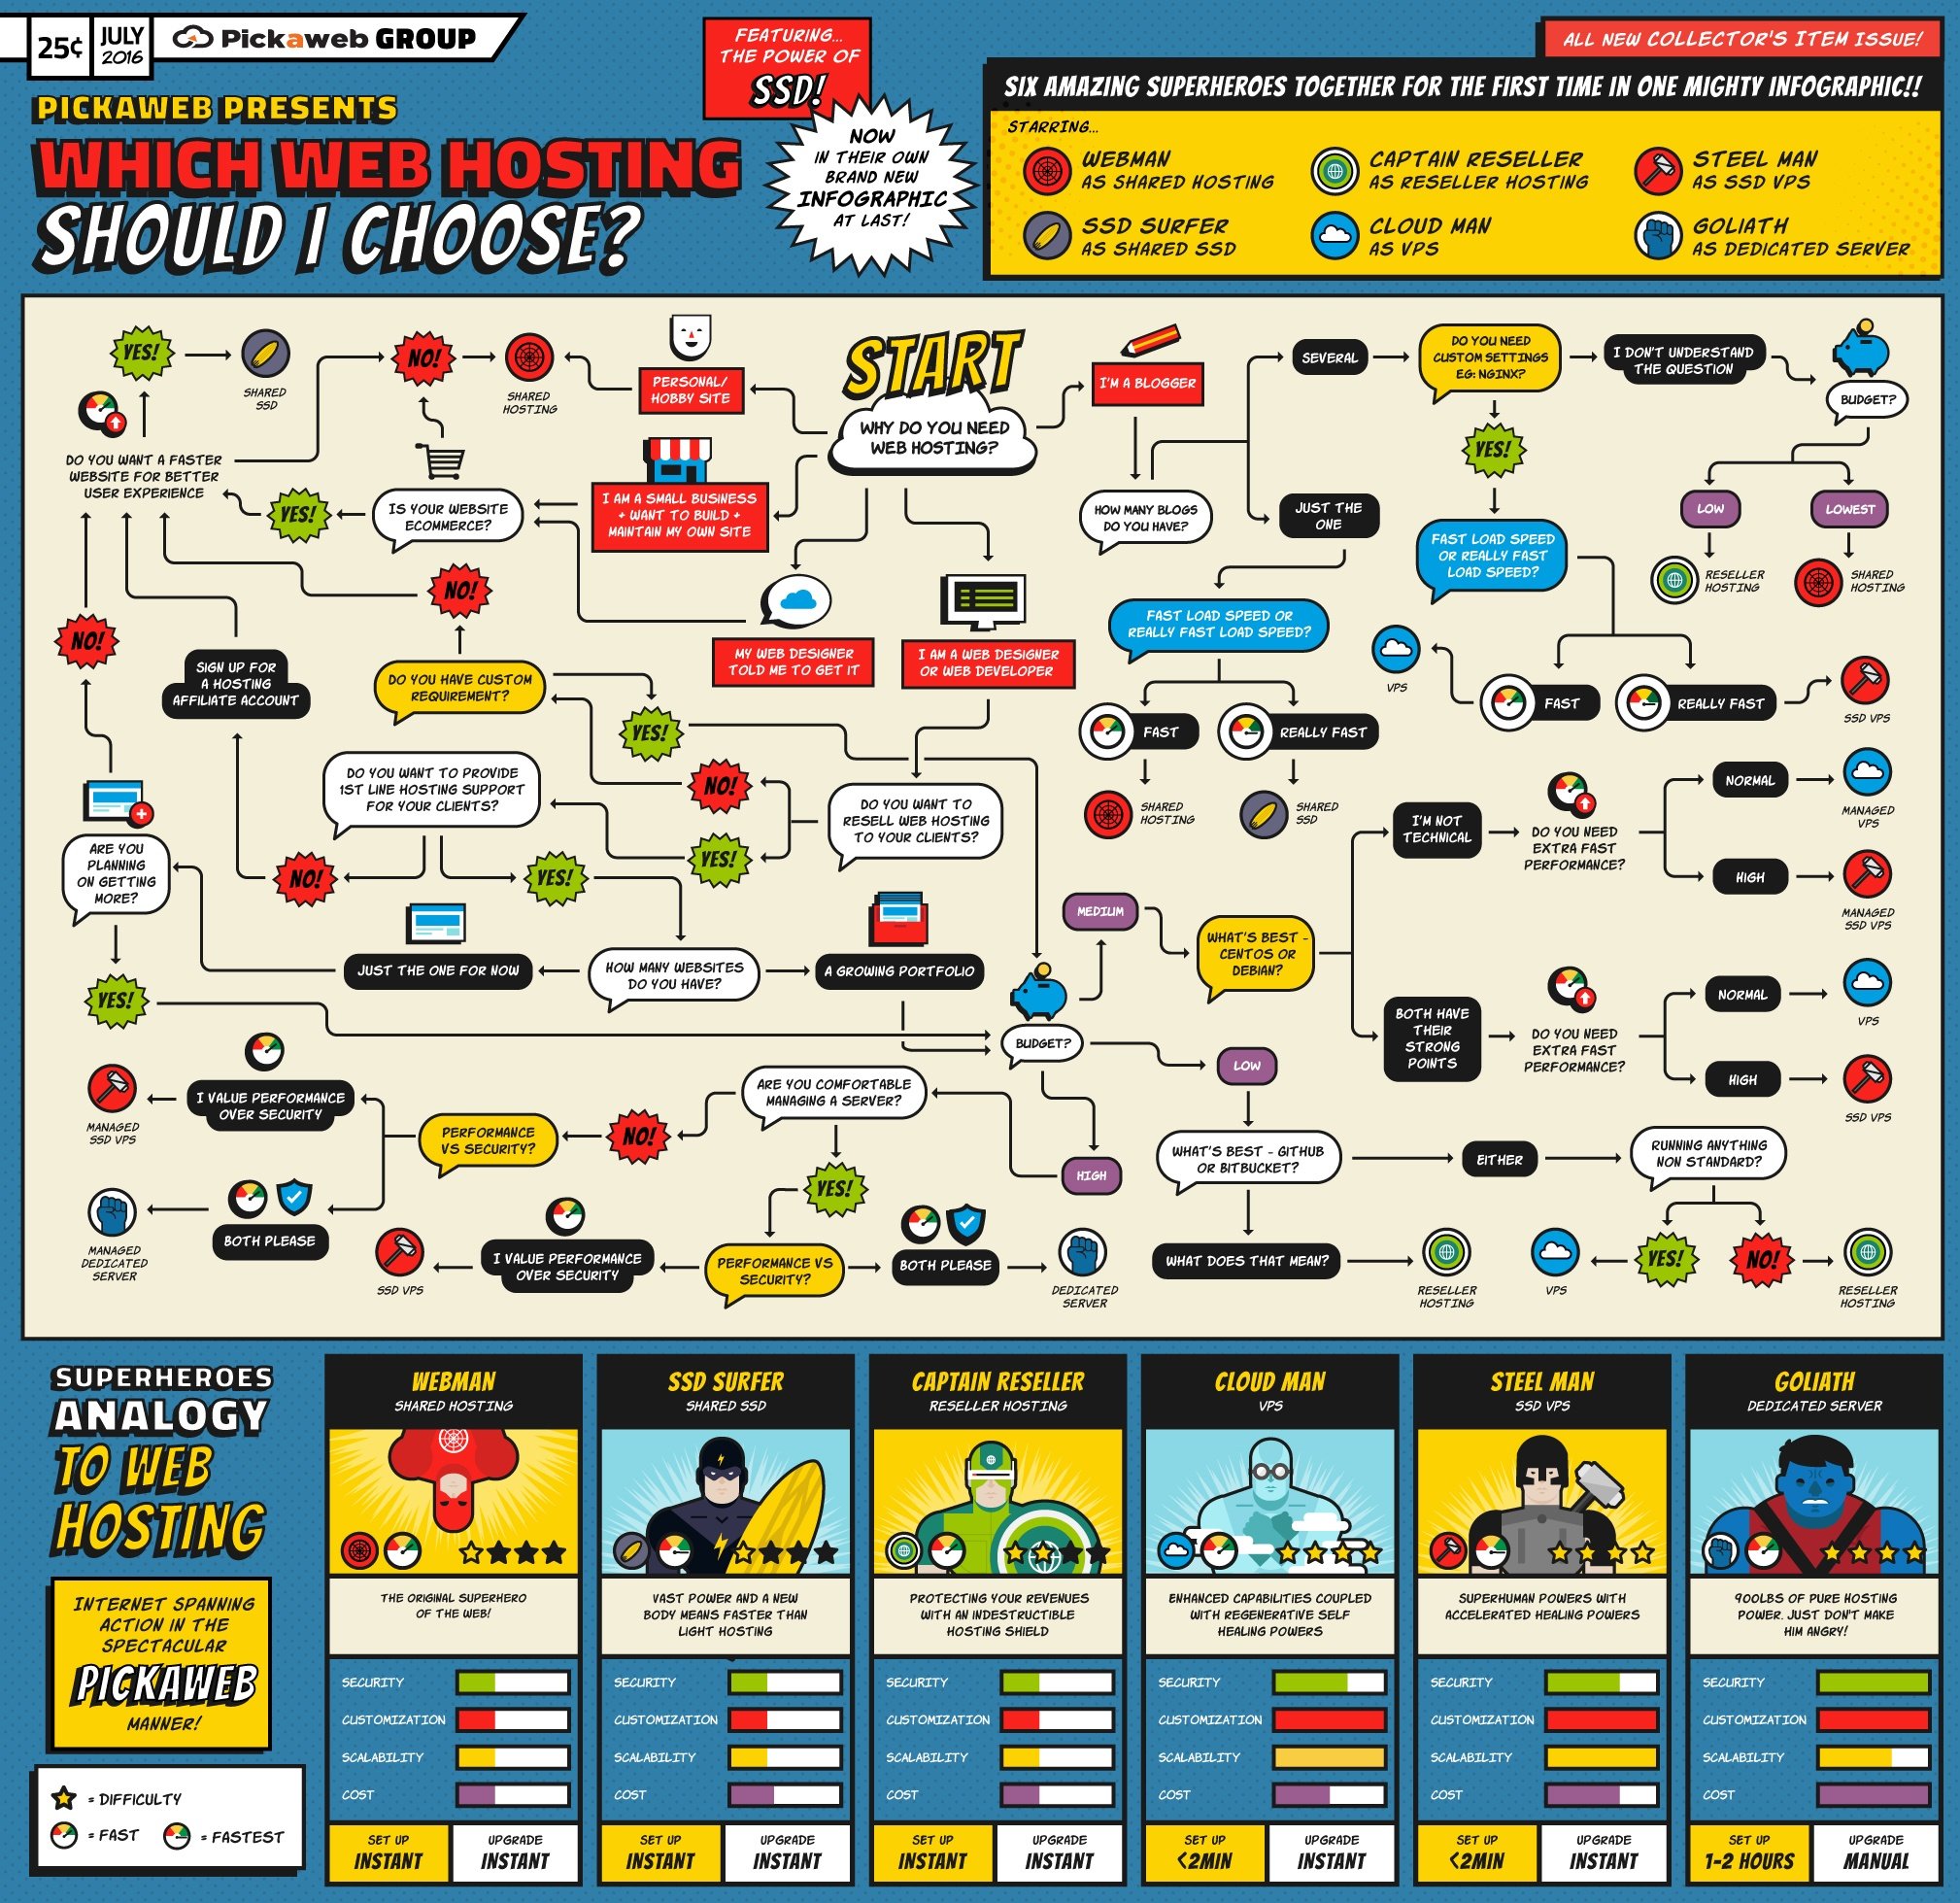
Comparison/Decision Based
These types of Flow Diagrams enable the reader to make an informed decision. For example I have created content that helps users choose the right web hosting (see below) for their needs or to choose the best Content Management System (e.g. WordPress, Joomla, etc..). For this type of diagram it is best to have around five or six options to choose from so that you can make a comprehensive comparison of the options.
Step 2 - Identify The Key Events
Once you’ve decided on the type of diagram you just need to sketch out the logical order of events. Ideally you need around ten to twelve points. For example, on a recent piece I did on switching a website from HTTP to HTTPS I quickly identified the following key steps involved (for further reading please see our full guide on switching to HTTPS which describes the following steps in detail):
- Choose an SSL Certificate
- Install and Configure SSL Certificate
- Update Internal Links
- Update Code Libraries
- Update External Links (under your control)
- Update HTaccess
- Do 301s where necessary
- Update CDN SSL (if necessary)
- Update Analytics/Google Webmaster/Console/Sitemaps
- Have a Coffee/Tea!
You can just do this on a piece of paper. If you’re familiar with the topic this shouldn’t take you more than a few minutes. Just name the steps and aim for between ten to twelve ideally.
Step 3 - Convert To Gliffy
At this point you have a skeleton Flow Diagram that you can start to add some flesh to.
So open up your favourite Flow Diagram software, Gliffy and you can get to work.
All I do is just work through the process in order asking the relevant questions along the way. So in the example above the first question will be: Have you purchased an SSL Certificate?
So here we have a question with a yes or no option.
If the answer is ‘no’ we can then explore the options available and ask relevant questions such as how many domains do you need to cover, do you want to cover subdomains, what’s your budget, do you want the green browser bar, etc.. All of these questions allow the viewer to make an informed decision and make the right selection so that they can then answer ‘yes’.
Once ‘yes’ is answered we just proceed to the next step (Install and Configure SSL Certificate). The questions process is just repeated for this step, e.g.: Who’s server will it be installed on, who will install it, etc. until we have answered ‘yes’ and confirmed that the SSL Certificate is installed.
So all you need to do is go through each of the main points you have identified and ask a series of yes/no questions until you get to the final task—have a tea or coffee.
At this stage it will look something like this:
Step 4 - Pass To Your Designer
Now all you need to do is pass the image over to your designer to let them work their magic. If you don’t have a designer then check out an outsourcing site like guru or upwork. Or maybe you can start a competition in 99Designs so that you get a number of options presented to you.
I’ll admit that finding a decent designer can take time and is a question of trial and error. Ask for examples of their previous work and get a fixed quote.
After a few revisions it will look like this:
Step 5 - Outreach & Promotion
OK, this is where the fun starts.
Most people will publish first and promote after. That’s not going to get the best results in my experience.
A better approach is to create a list of Influencers and work with them to get them onboard and helping you to promote your content.
Your Influencers will share these characteristics:
- They operate in a complementary, non-competing niche (i.e. they have a following of people who could be interested in your product or service)
- They have a blog—either as part of a business or it is their own blog
- Their blog is curated and cared for—they are publishing content regularly (they get bonus points if they get comments from their followers)
- They have a following on social media
Some of them you will know already. Others you can find by searching in Google on ‘[INDUSTRY] Blog’ where you just replace ‘INDUSTRY’ with the niche.
Or you can find them in blog aggregator sites like Alltop.
Just create a google doc with their details on it and their main social media (usually Twitter) details.
Some people will say that when it comes to outreach you should get on their radar first by following them on social media and liking/tweeting/+ing their content and commenting on their blog. That’s probably great if you’re trying to get the attention of more established ‘faces’ of the blogging world.
However, if you’re working with businesses or up-and-coming bloggers then I think you can be a little more direct. Basically just drop them a quick email.
Your email just needs to introduce yourself and ask them for some advice. Something like this:
Hi [NAME],
This is [YOUR NAME] from [YOUR COMPANY]. I’m just contacting you today because I’m working on a detailed graphic about [TOPIC] and I know from reading your blog and following you on social media that you’re an expert on this area.
I was just wondering if I could just quickly send it over to you for a quick review before I publish it. That way I can make any adjustments before it goes live.
You’ll soon find what works best for you. But all you’re doing is asking for their feedback.
Here’s a link to a guy who really nails this process at GrooveHQ.
People feel flattered that you’re asking for their opinion and feedback and I’m sure you’ll be pleasantly surprised by the feedback you get.
Step 6 - Publish & Promote
Now that you’ve got some Influencers onboard it’s time to publish.
As soon as you hit the ‘publish’ button you can follow up again with your Influencers to let them know that you’re live. Just a quick ‘We’re Live’ email will do.
Just tell them that your content is live, give them the link and don’t feel shy to ask for a share, a comment or even a link back.
Don’t forget to let your own email subscribers know as well as pushing it out on social media. As I mentioned previously the social web is increasingly visual and this type of content will get shares.
Step 7 - Keep On Promoting
But promoting on day 1 is just the start. You need to keep promoting your content. Great content has a long shelf life so be sure to look for opportunities to get your content featured.
In terms of social media CoSchedule have created a great post with loads of ideas for promoting your content.
The point is that you don’t just publish and forget. Promotion is an ongoing process so always look for opportunities. In fact, some even estimate that you should allocate your content time as an 80:20 ratio of content promotion vs content creation.
Wrap Up
Flow Diagrams aren’t just dusty old documents used by systems analysts. They can be vital and fun ways to breathe life into an online marketing strategy.
The web is increasingly visual and diagrams can be used to visually describe either complex, multi-step processes or for aiding the decision making process by comparing similar products or services.
So do you have any processes or comparisons that you can apply this approach to?
This post is brought to you by our friend Tony Messer, the Co-Founder of UK web host www.pickaweb.co.uk. Tony is self starter Entrepreneur and is passionate about helping businesses get the most out of their online presence. He's also the Author of the Amazon 5 Star rated book - The Lazy Website Syndrome. Tony is based in the South of Spain.