Purpose-built for simplifying complex workflows, swimlane diagrams help eliminate ambiguity, ensure accountability, and enable teams to see how their contributions fit into the bigger picture.
Whether you're mapping business processes, outlining project workflows, or clarifying role ownership, swimlane diagrams keep teams aligned and projects moving forward.
In this blog, we’ll go over how teams use swimlane diagrams to collaborate effectively and how you can create your own. To get started building your swimlane diagram, start your free evaluation of Gliffy for Confluence:
Back to topWhat Is a Swimlane Diagram?
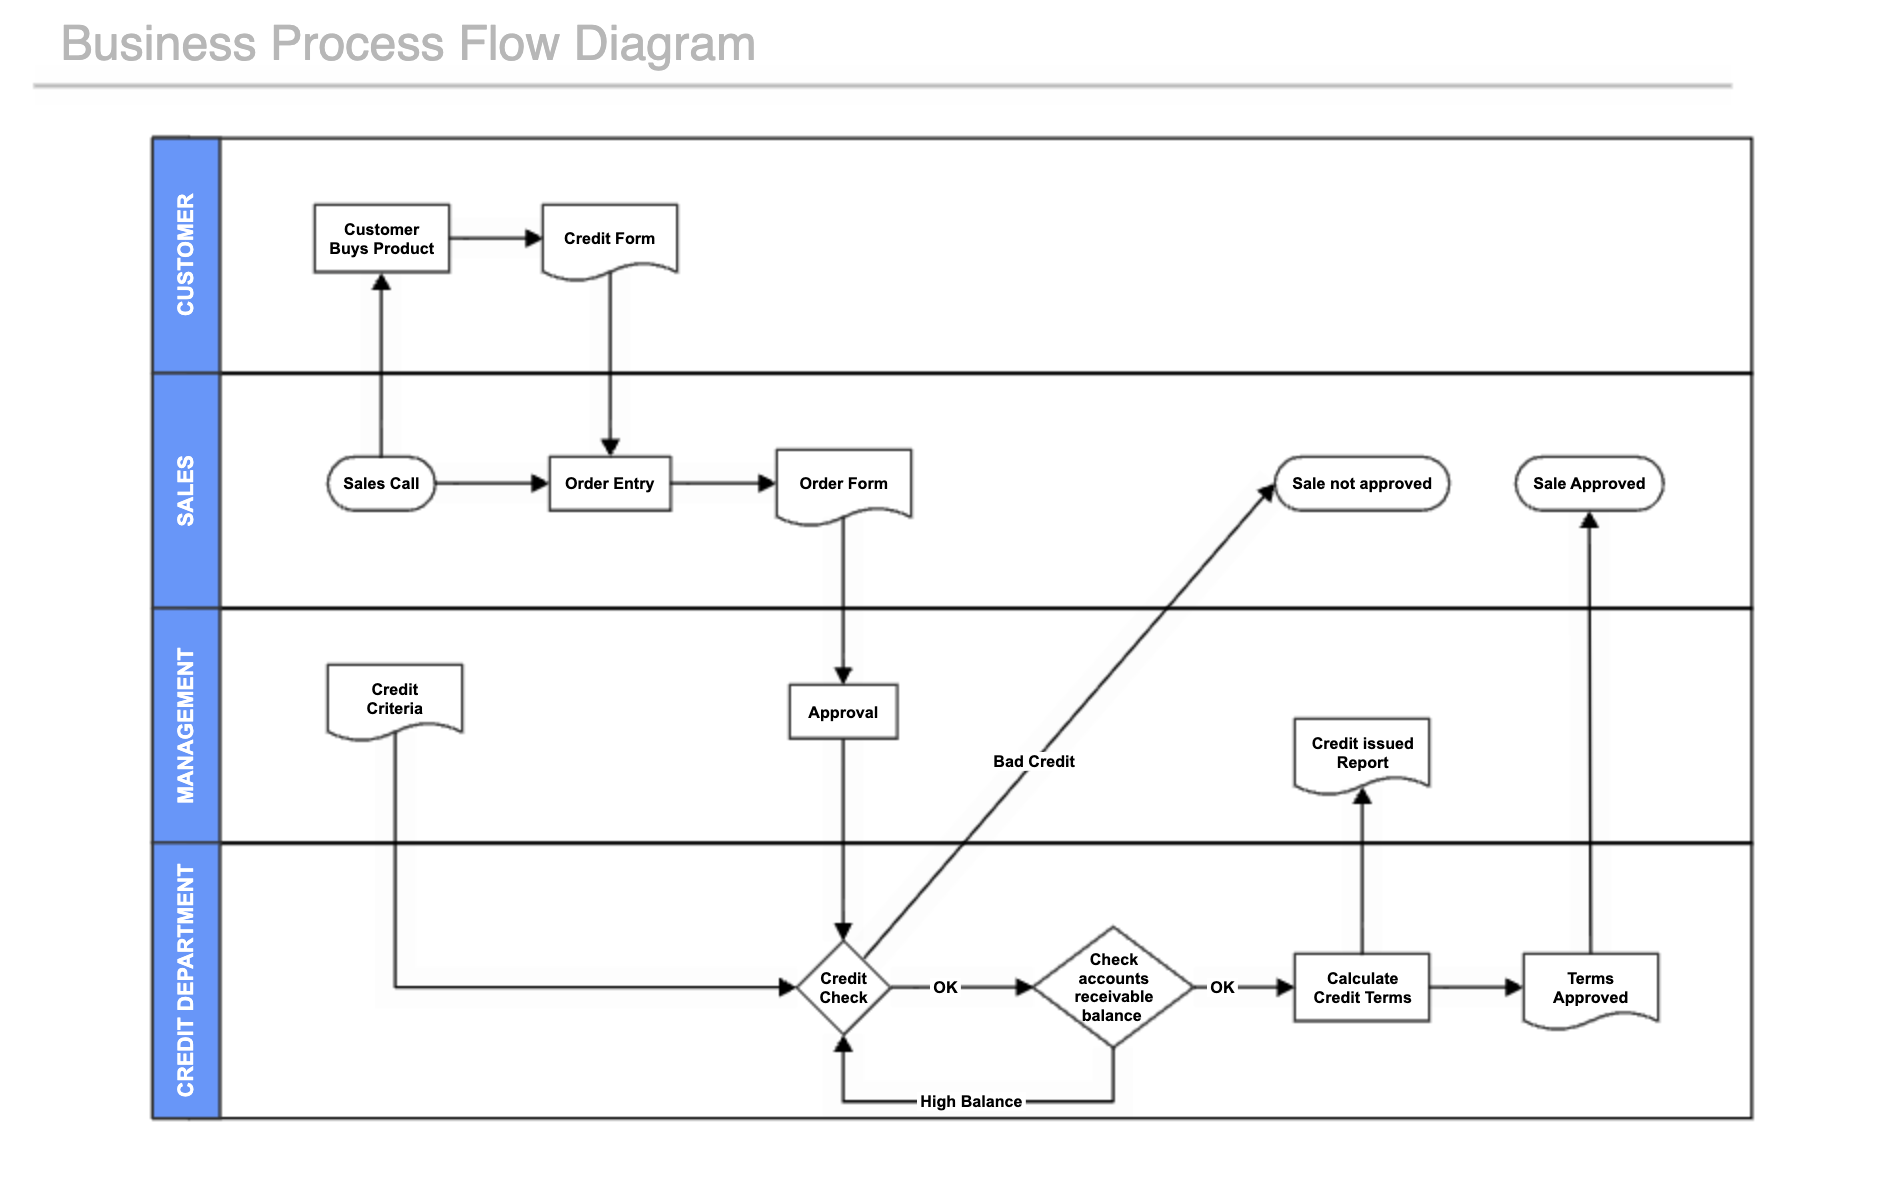
A swimlane diagram is a type of flowchart that shows who is responsible for each part of a process. The name references the lanes of a swimming pool, with each lane acting as a dedicated space for a business role or department.
Swimlane diagrams are also called functional bands, multi-column charts, or Rummler-Brache diagrams.
While adding lanes to a flowchart may make it sound more complicated, in practice swimlanes and swimlane diagrams are used to simplify diagrams that would otherwise be overly complex.
Back to topHow a Swimlane Diagram Works
In swimlane diagrams, steps of a process are split into channels according to which person or department is responsible for each one. This allows each person or team to quickly and easily see what they’re expected to accomplish and when.
Because the lanes are arranged side by side, events can be organized in sequence and connected by arrows, with multiple processes coming together to form a whole. This also helps clarify which steps of the process can be completed simultaneously.
With the help of the swimlane diagram format, teams can communicate more effectively and keep projects moving without delays.
Swimlane Diagrams vs. Flowcharts: Key Differences
Swimlane diagrams are always considered a type of flowchart, but in order for a flowchart to be considered a swimlane diagram, it must:
- Separate processes into lanes (either horizontally or vertically)
- Organize tasks in sequential order along the other axis
Doing both things together provides the most value for viewers because each individual contributor or department can see all assigned tasks broken out into a distinct channel.
They can also see how their work fits into the bigger picture to better understand when and why they can expect to be called on for their part.
Back to topWhat Is a Swimlane Diagram Used For?
Product teams, business teams, and many more types of teams across enterprise organizations create and use swimlane diagrams. Our guide to what a flowchart is used for describes in further detail how flowcharts, like swimlane diagrams, help these teams clarify and communicate processes.
Most often, swimlane diagrams in particular are used by multi-department organizations to illustrate cooperative business processes. They can also be a simple way to resolve confusion around who owns each part of a process.
Swimlane Diagrams for Cross-Functional Projects
When you build a cross-functional process flowchart with swimlanes, each one represents a specific role, team, or department.
Swimlane diagrams make project handoffs between cross-functional teams smoother by providing a clear and structured visual representation of responsibilities and workflows. The diagram clearly shows where tasks transition from one swimlane (team or role) to another, reducing confusion about who takes over at each stage.
Swimlanes break down complex processes into manageable sections, making the overall diagram less overwhelming and more intuitive. They also make it easy to see how tasks are interconnected, ensuring that prerequisites are met before a handoff occurs.
Business Process Mapping with Swimlanes
Swimlanes help clarify a business process, and you can easily incorporate them into your business process diagrams for clear communication and workflow optimization.
Back to top
How to Create Swimlane Diagrams
Creating a Swimlane Diagram in Gliffy for Confluence
You can create your own swimlane diagrams directly in Confluence by following these quick, easy steps. Make sure to start your free trial of Gliffy to follow along.
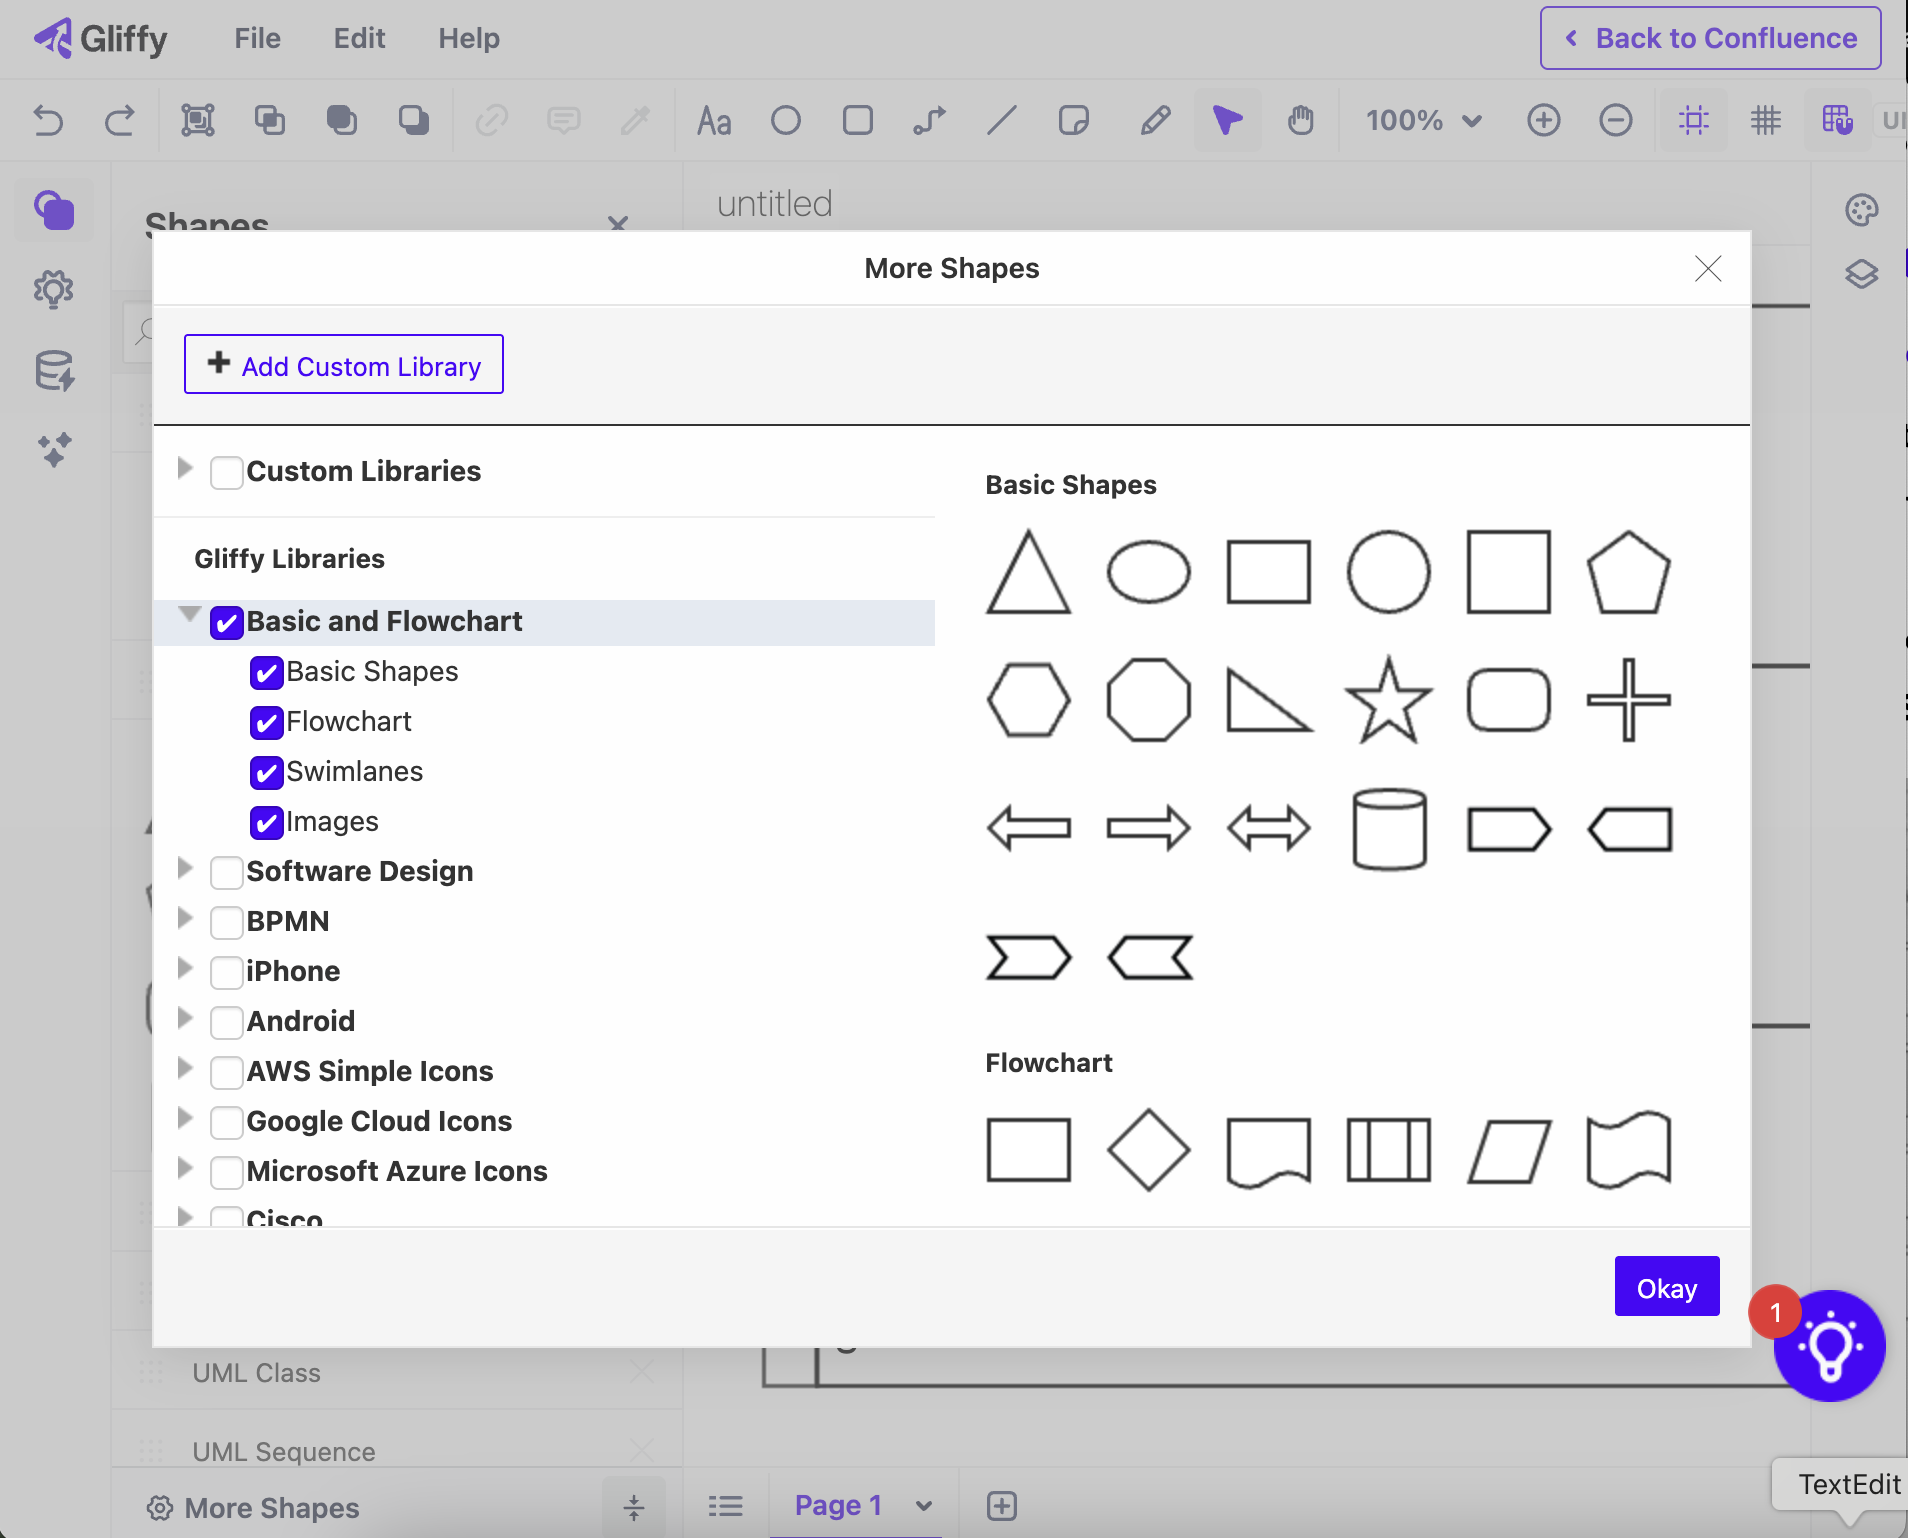
Step 1: Open Swimlane Shapes
To start your swimlane diagram, make sure you can see the Swimlane shapes in the panel along the left side of your canvas.
If the Swimlane shapes aren’t there, you’ll need to add them by clicking More Shapes, expanding the Basic and Flowchart section, and selecting the Swimlanes box.
Step 2: Customize Your Swim Lanes
Drag the swimlane shape that best suits your needs onto your canvas. By selecting the shape, you can change its total size, the size of individual lanes, or the shape’s orientation.
You can use as many lanes as your process demands and orient the diagram whichever way makes the most sense for your situation.
To add or subtract lanes, select the swimlane shape, then click the edit custom properties icon that looks like a gear in the popup menu. From here, you can set the number of lanes you want.
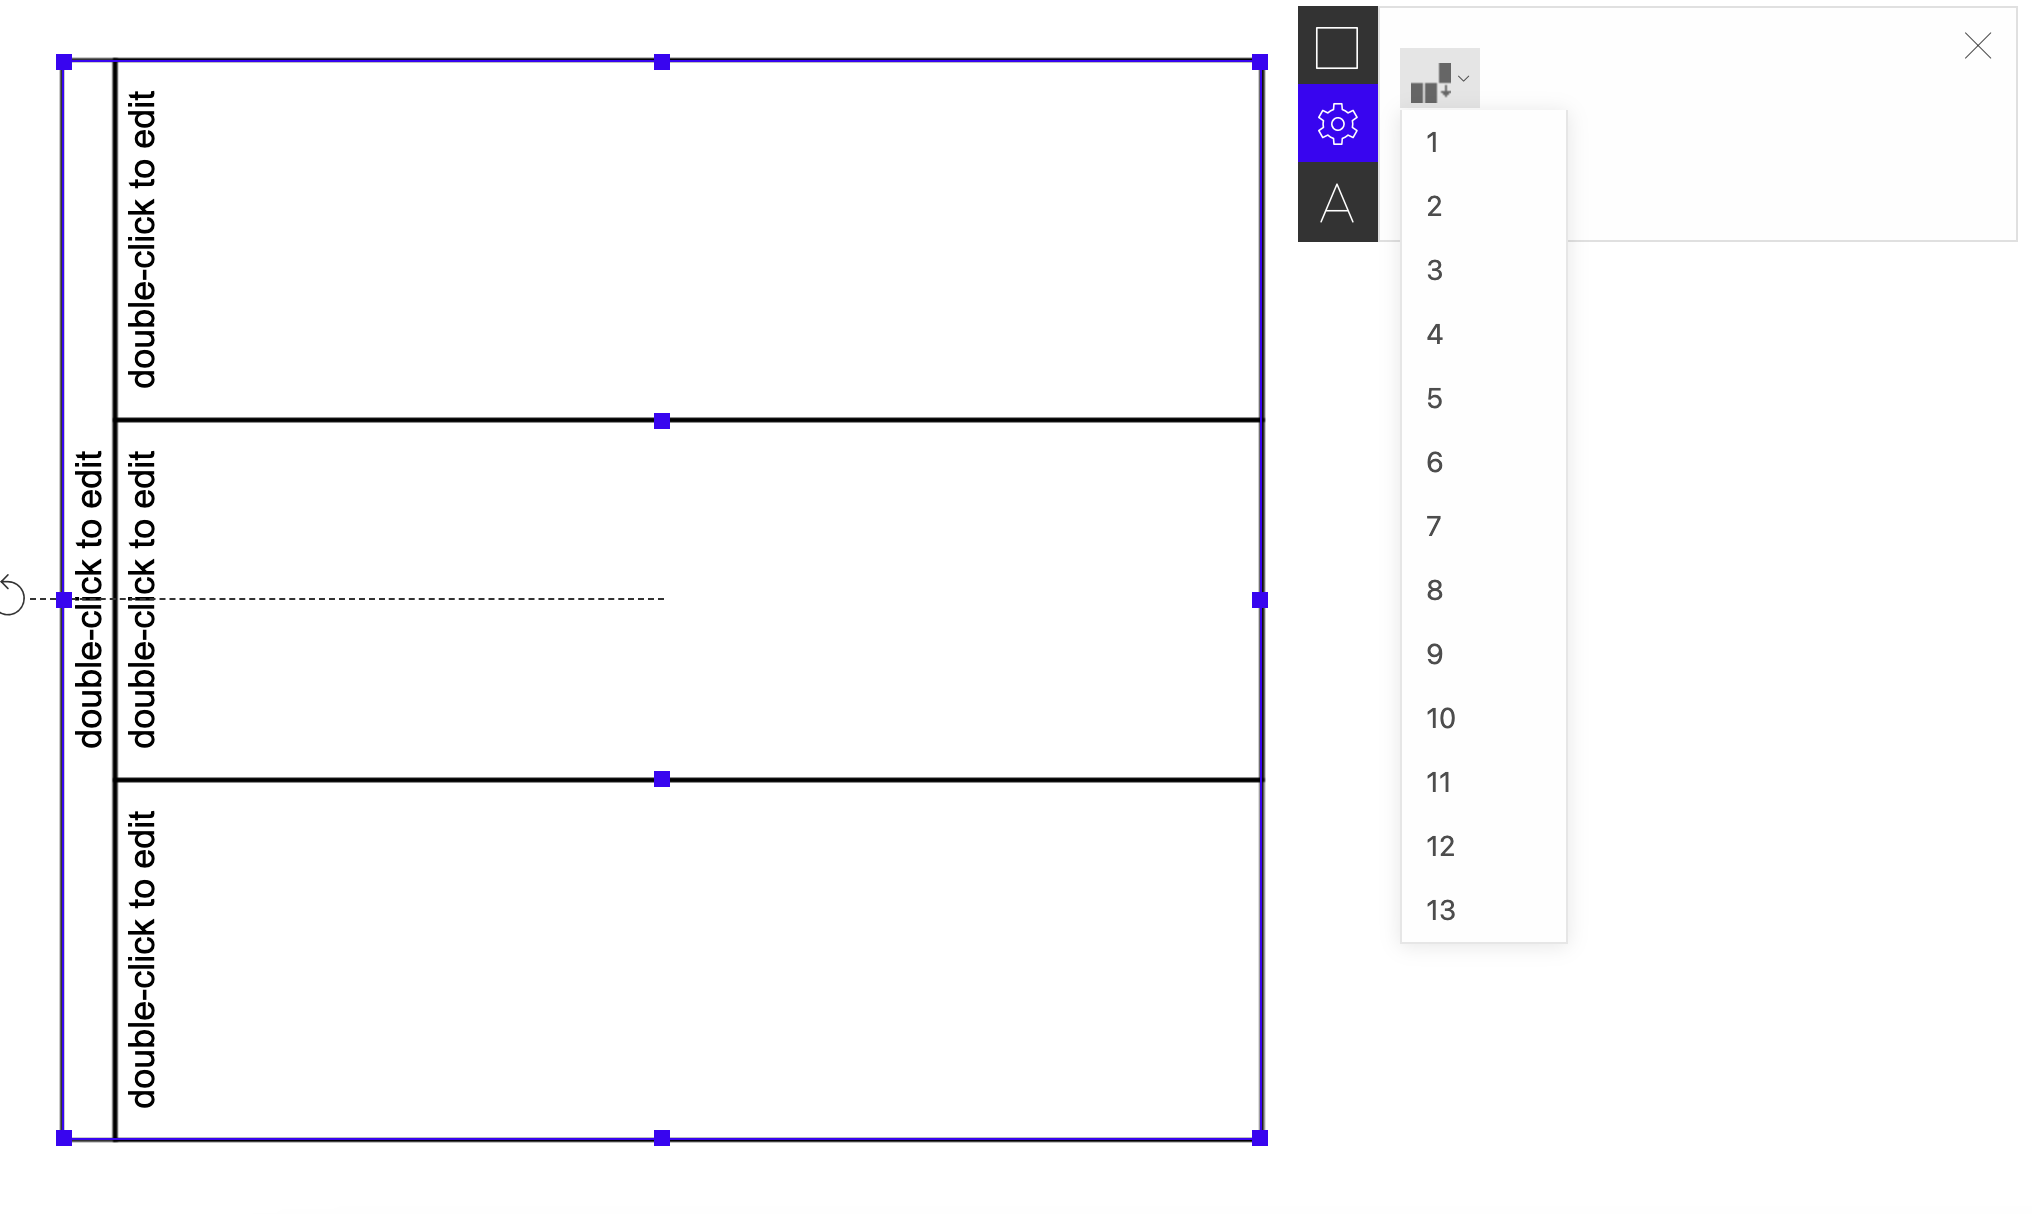
Tip: Set your desired lane size first, as any new lanes you add will automatically match your existing lanes.
Step 3: Create a New Layer
Once your blank swimlanes are ready, create a new layer to build your flowchart on and lock the layer with the swimlane shape.
This will make it easy for you to drag and drop flowchart shapes on top of the swimlanes and move them around without accidentally moving your lanes.
Step 4: Build Out Your Flowchart
Use the Flowchart section of the shape library to fill out your swimlane diagram with process events and connect them with arrows.
Make sure to use standard flowchart symbols so anyone in your organization can easily understand the process at a high level.
Creating Swimlane Diagrams with AI
With Gliffy, you can generate flowcharts in seconds using the AI tool. However, the flowchart you generate won’t include swimlanes.
To create a swimlane diagram with AI in Gliffy, follow the first three steps described above (add a blank swimlane shape to the canvas and create a new layer), then use the AI tool to generate your flowchart on the new layer.
The generated flowchart will appear on the canvas as a single shape, but you can move individual shapes around by clicking on the flowchart and selecting “Finish editing.” Then, you can move different parts of the flowchart to the proper lanes.
Back to topTools for Making Swimlane Diagrams
With Gliffy, you can create swimlane diagrams in a fraction of the time that you would take to write out a process or hold a meeting to explain each step of the process to your team.
To get started, you can find a swimlane diagram template by typing /gliffy on any Confluence page and browsing through our template gallery, or you can generate a flowchart over blank swimlanes with Gliffy’s AI diagram generator.
Whichever option you choose to build your swimlane diagram, Gliffy makes it fast and easy to create and share with your team.